This article explains how to make the computer, home, thrash and network icons to be visible on the Ubuntu desktop.
step 1:
press alt + f2 (this command will prompt you with the run dialog box)
step 2:
type gconf-editor on the text box (in the run dialog box) and press run. You will be prompted with the configuration editor of gnome.
step 3:
go to apps > nautilus > desktop
step 4:
put the ticks on
computer_icon_visible, home_icon_visible, network_icon_visible, thrash_icon_visible.
Friday, September 25, 2009
Wednesday, June 03, 2009
OMG where is telnet :)
Being an extensive Windows XP and Ubuntu user, I happened to bump into some unknown waters in the name of Windows Vista.
My objective was to use telnet, and as usual I used the telnet command. But it was quite unusual to see that telnet was actually missing in Vista. After using BING to find how to add Vista I DECIDED to write a blog article on how to add the telnet client to Vista. Well folks I am keeping up to the theme (BING AND DECIDE) of Bing right? Well to tell you the truth the only decision I made after the search was the decision to write a blog article!!! :)
Step 1.
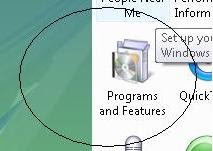
Go to the control panel

Step 2.
Click on “Programs and Features”.
Step 3.
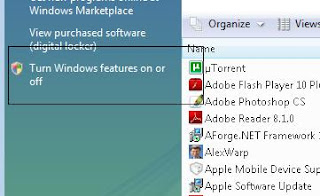
After the window for “Progams and Features” appear on click on “Turn Windows Features on or off” which should be there to the left of your screen.
Step 4.
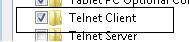
Select and tick the telnet server from the huge list that appears. Afterwards click ok and wait till it installs.
Step 5.
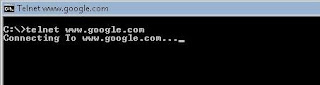
Finally, Vista has a telnet client.
My objective was to use telnet, and as usual I used the telnet command. But it was quite unusual to see that telnet was actually missing in Vista. After using BING to find how to add Vista I DECIDED to write a blog article on how to add the telnet client to Vista. Well folks I am keeping up to the theme (BING AND DECIDE) of Bing right? Well to tell you the truth the only decision I made after the search was the decision to write a blog article!!! :)
Step 1.
Go to the control panel

Step 2.
Click on “Programs and Features”.

Step 3.
After the window for “Progams and Features” appear on click on “Turn Windows Features on or off” which should be there to the left of your screen.

Step 4.
Select and tick the telnet server from the huge list that appears. Afterwards click ok and wait till it installs.

Step 5.
Finally, Vista has a telnet client.

Tuesday, February 10, 2009
How to create an iTunes account without a credit card number
Hi Guys, for most of you who don’t like to give their credit card numbers or for people who don’t have a credit card (like me) here is way to create an iTunes account.
- Step 01
Download and install iTunes in your PC
- Step 02
As the next step start the iTunes application. Once you start the iTunes app you will get a screen like below.

- Step 03
Next click on the iTunes store, which is on the left had corner. There you will be directed into the local store. Because I am a Sri Lankan I was redirected to the Sri Lankan store.

- Step 04
Next select a free app and (any) under the top free apps category related to your local store. In the image above check on the bottom right hand corner.
- Step 05
Once you have clicked on the free app you will be directed into a page related to that free app. Once you arrive at that page, click on GetApp.

- Step 06
Then you will get a dialog box as follows. Click on Create a new account. Then the registration wizard will start off.


- Step 07
Once you click on Create New Account, they will provide you with a license agreement. As always don’t waste time to read it, just accept it and move on to the next step.

- Step 08
Next you will be getting a form like the image below. Select the payment method as none and provide the other details. In subsequent steps you will be asked to provide your AppleID. Provide your email address for that and continue with the registration wizard. Once you have conducted the registration wizard login to the email address you provided and confirm the registration email. Once that is done you have created an iTunes account without providing your credit card details.

Subscribe to:
Posts (Atom)